
Best Debugging Tools to Buy in July 2026
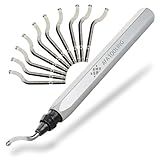
AFA Tooling - Deburring Tool Micro-Polished & Anodized Handle with 11 High-Speed Steel M2 Blades, Deburring Tool 3D Printing, Reamer Tool for Metal, PVC, Copper Pipe, Plastic, Resin & 3D Printed Edges
-
INDUSTRIAL-GRADE BLADES: M2 HSS BLADES LAST 80% LONGER THAN CARBON STEEL.
-
PRECISION CNC HANDLE: ANODIZED ALUMINUM GRIP ENSURES STABILITY AND CONTROL.
-
EFFORTLESS BLADE SWIVEL: 360° MECHANISM ALLOWS SMOOTH CONTOUR TRACKING.


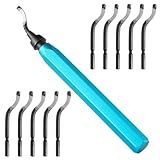
Deburring Tool with 12 High Speed Steel Blades, Deburring Tool 3D Printing, Deburring Tool for Metal, Resin, Copper, Plastic, PVC Pipes, 3D Printed Edges (1 Blue Handle)
- VERSATILE TOOL: EASILY SWITCHES BLADES FOR VARIOUS MATERIALS AND TASKS.
- QUICK & EFFICIENT: SHARP CUTTER HEAD ENSURES SMOOTH, BURR-FREE SURFACES.
- USER-FRIENDLY DESIGN: INSTALLS BLADES EFFORTLESSLY FOR 360° COVERAGE.
Aleric Deburring Tool Set with 11pcs High Speed Steel Swivel Blades, Deburring Tool 3D Printing Burr Removal Blades, Deburring Tools for Metal, Resin, PVC Pipes, Copper, Plastic, Aluminum
- VERSATILE USE: PERFECT FOR METAL, PLASTIC, AND 3D PRINTING APPLICATIONS.
- DURABLE DESIGN: HIGH-SPEED STEEL BLADES ENSURE LONGEVITY AND PRECISION.
- USER-FRIENDLY: COMFORTABLE GRIP AND EASY BLADE REPLACEMENT FOR EFFICIENCY.
Visual Studio Code: End-to-End Editing and Debugging Tools for Web Developers
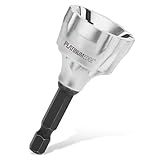
PLATINUMEDGE Deburring External Chamfer Tool with 3 Tungsten Carbide Blades,Quick Release 1/4" Hex Shank, Fits 1/8"-3/4" (3-19mm) – Repair Damaged Bolts, Screws, Threaded Rods & Pipe
- DURABLE CONSTRUCTION: LONG-LASTING STAINLESS STEEL & YG8 CARBIDE BLADES.
- VERSATILE FIT: SUPPORTS DRILL SPEEDS 0-400 RPM; FITS VARIOUS STOCK SIZES.
- SAFETY FIRST: QUICK REPAIRS WITH NO BURNS, SPARKS, OR HAND INJURIES.

Practical Debugging for .NET Developers: Tools and Techniques to debug and solve real-world problems in .NET
Hands-On Penetration Testing on Windows: Unleash Kali Linux, PowerShell, and Windows debugging tools for security testing and analysis
To set debugger parameters in Delphi 7, follow these steps:
- Open your Delphi 7 project.
- Click on the "Project" menu at the top of the IDE (Integrated Development Environment) window.
- From the dropdown menu, select "Options".
- In the "Project Options" dialog box, go to the "Debugger" tab.
- Under the "Host application" section, you can specify the executable that the debugger will run. Click on the ellipsis (three dots) button to browse and select the desired executable file.
- If you need to pass any command-line arguments to the host application, you can enter them in the "Parameters" field.
- If required, you can set the working directory for the debugger by entering the desired path in the "Working directory" field.
- Under the "Run" section, you can choose whether to start debugging immediately after the application is built by selecting the "Run after compile" checkbox.
- You can also select whether to pause the debugger on program termination by checking the "Pause on exceptions" checkbox.
- Once you have set the desired debugger parameters, click "OK" to save the changes and close the dialog box.
By setting the debugger parameters, you can customize how your Delphi 7 project executes and debugs, allowing you to efficiently analyze and troubleshoot any issues that may arise.
What is the role of the "Run parameters" tab in debugger settings?
The "Run parameters" tab in debugger settings allows a developer to specify the command-line arguments, environment variables, and working directory for executing a program or script during debugging.
Command-line arguments: Developers can specify any necessary arguments required by the program being debugged. These arguments can alter the behavior or configuration of the program.
Environment variables: Developers can set environment variables that affect the runtime environment of the program. Environment variables can contain information such as paths, configurations, or other data that the program might depend on.
Working directory: The working directory determines the current directory that the program will use during execution. It can affect the program's file input/output operations or relative path resolutions.
By configuring the run parameters in the debugger settings, developers can control the initial conditions under which their code is executed during the debugging process. This can be useful for reproducing specific scenarios, testing different configurations, or accommodating dependencies.
What is the significance of "Use runtime packages" option in debugger settings?
The "Use runtime packages" option in the debugger settings refers to a feature in some integrated development environments (IDEs), such as Delphi and Lazarus.
When developing an application, one can choose to include the necessary code and components directly into the final executable file, making it self-contained. This is known as static linking. However, using static linking can result in larger executable sizes.
On the other hand, the "Use runtime packages" option enables the developer to link the application to external dynamic-link libraries (DLLs) known as runtime packages. These DLLs contain reusable code, such as common routines, classes, and components, that can be shared by multiple applications. By utilizing runtime packages, the executable file size is reduced as it only needs to include references to the necessary packages, rather than the entire code.
The significance of this option includes:
- Reducing executable size: By using runtime packages, the size of the application's executable can be significantly smaller, especially when multiple applications share common code.
- Code and component sharing: Runtime packages allow different applications to use the same code and components, reducing code duplication, and promoting reusability.
- Faster development and updates: Since common code is in a separate package, any changes or updates made to the package are automatically reflected in all applications that use it. This saves development time and ensures consistency across the applications.
- Improved maintenance and bug fixing: By separating common code into packages, bug fixes and updates can be applied to the packages without having to rebuild and redistribute the entire application. This improves maintenance and speeds up the deployment of fixes.
However, there can also be challenges associated with using runtime packages, such as ensuring the correct version of the packages are available and properly handled during application deployment.
How to enable the "Stop on Delphi Exceptions" option in debugger settings?
To enable the "Stop on Delphi Exceptions" option in the debugger settings, follow these steps:
- Open your Delphi IDE (Integrated Development Environment) application.
- Go to the "Tools" menu and select "Options." Alternatively, you can press "Ctrl + Alt + O" on your keyboard to directly access the Options menu.
- In the Options window, navigate to the "Debugger Options" category on the left-hand side.
- Under the "Language Exceptions" section, you will find a checkbox labeled "Stop on Delphi Exceptions." Make sure this checkbox is checked to enable the option.
- Click the "OK" button to save your changes and close the Options window.
Once you have enabled the "Stop on Delphi Exceptions" option, the debugger will pause the execution of your program whenever a Delphi exception is raised. This allows you to inspect the current state of your application and determine the cause of the exception.