
Best Electric Dirt Bike Troubleshooting Tools to Buy in July 2026
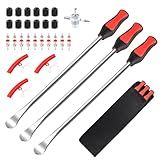
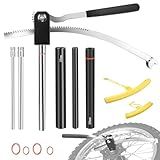
Rpeconu 15" Tire Spoons Kit, Tire Changing Tool for Motorcycles, Dirt Bikes, Lawn Mowers and More, 29PCS Tire Removal Tool Set, with Tire Spoon, Rim Protector, Valve Tool, Valve Cover and Valve Core
-
COMPREHENSIVE SET: 3 TIRE SPOONS, RIM PROTECTORS, VALVE TOOLS INCLUDED!
-
DURABLE HARDENED STEEL TOOLS ENSURE LONGEVITY AND EFFECTIVE PERFORMANCE.
-
ERGONOMIC DESIGN REDUCES FATIGUE AND ENHANCES TIRE CHANGE EFFICIENCY.


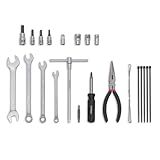
CruzTOOLS SBJM Switchback Dirt Bike Tool Kit for Honda, Yamaha, Kawasaki, Suzuki
- COMPACT AND LIGHTWEIGHT, PERFECT FOR TRAIL-SIDE REPAIRS.
- LIFETIME WARRANTY ON ALL TOOLS FOR PEACE OF MIND.
- INCLUDES ESSENTIAL TOOLS FOR QUICK AND EFFICIENT ADJUSTMENTS.
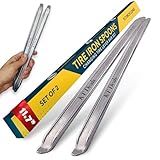
2pc Tire Iron Set Tire Spoons Levers Motorcycle Tire Changer Spoons Dirtbike Tire Changing Tools Remover Heavy Duty Steel Tyre Removal Tool Spoon for Dirt Bike Scooter Bicycle Mower (11.7 inch)
- COMPACT DESIGN: EASY TO CARRY IN TOOL BAGS FOR ON-THE-GO REPAIRS.
- DURABLE CONSTRUCTION: MADE FROM HEAVY-DUTY FORGED STEEL FOR MAXIMUM STRENGTH.
- VERSATILE USE: COMPATIBLE WITH MOTORCYCLES, SCOOTERS, AND MORE FOR DIY REPAIRS.
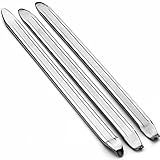
TIPIPARK 3 Pcs Bike Tire Levers - Motorcycle Tire Spoons Iron Set Dirt Bike Tire Changing Tools 10" Lengthen Premium Stainless Steel Repair Tube for Motorcycles Electric Bicycles Mountain Dirtbike
- LENGTHENED 10 LEVERS PERFECT FOR BIKES AND ELECTRIC VEHICLES!
- DURABLE GALVANIZED DESIGN ENSURES STRENGTH AND LONGEVITY!
- USER-FRIENDLY HEAD FOR QUICK AND EASY TIRE REMOVAL!
JINGTAO88 Dirt Bike Tire Changing Tool Kit, Suitable for 16-21 Inch Wheels, Including 10/12/15mm Axle Adapters, Quick Tire Change in The Wild, and Foldable Design for Easy Portability, Black
- COMPLETE TOOLKIT FITS 16 - 21 WHEELS; IDEAL FOR OFF-ROAD BIKES.
- COMPACT FOLDING DESIGN; PORTABLE AND EASY TO CARRY IN CYCLING BAGS.
- DURABLE STEEL CONSTRUCTION ENSURES LONG-LASTING, RELIABLE USE.
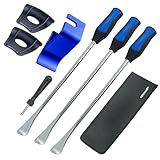
Motorcycle Tire Spoon Kit Dirt Bike Lawn Mower Tire Changer Tire Removal Tool with Bag 3x14.5 inchTire Irons and 2 Rim Protector1 Tire Bead Holder Tool
- ERGONOMIC DESIGN: EASY-GRIP HANDLE FOR EFFORTLESS TIRE CHANGES.
- PROTECT YOUR WHEELS: RIM SHIELDS PREVENT SCRATCHES DURING TASKS.
- DURABLE BUILD: HIGH-QUALITY MATERIALS ENSURE LONG-LASTING PERFORMANCE.
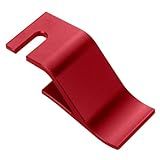
WINTOWIN Motorcycle Tire Installation Assistance Tool Holder Hook,Off-Road Tire Removal Install Assistance Changer Tool for Dirt Bike,Tire Changing Tool red
- EFFORTLESSLY CHANGE TIRES: YOUR THIRD HAND FOR EASY INSTALLATION!
- DURABLE STAINLESS STEEL DESIGN FOR LONG-LASTING PERFORMANCE.
- UNIVERSAL FIT: COMPATIBLE WITH MAJOR MOTORCYCLE BRANDS.
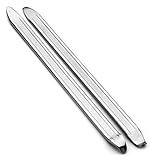
TIPIPARK 2 Pcs Bike Tire Levers - Motorcycle Tire Spoons Iron Set Dirt Bike Tire Changing Tools 10" Lengthen Premium Stainless Steel Repair Tube for Motorcycles Electric Bicycles Mountain Dirtbike
-
VERSATILE 10 LEVERS FOR MOTORCYCLES, BIKES, AND ELECTRIC VEHICLES.
-
DURABLE GALVANIZED DESIGN ENSURES STRENGTH AND LONGEVITY FOR TOUGH TASKS.
-
EASY TIRE REMOVAL WITH A SPECIALLY DESIGNED HEAD FOR QUICK USAGE.
If you are an adult experiencing issues with your electric dirt bike, there are a few troubleshooting steps you can take to identify and potentially resolve the problem. Start by checking the battery to ensure it is fully charged and properly connected. Next, inspect the wiring and connections to make sure everything is secure and free of damage. Test the throttle and brakes to ensure they are functioning correctly. If you are still experiencing issues, consult the manufacturer's manual or seek the help of a professional technician. By carefully diagnosing and addressing the problem, you can get back to enjoying your electric dirt bike.
How to test the wiring on an electric dirt bike?
To test the wiring on an electric dirt bike, you will need a multimeter to check for continuity and voltage. Here's how you can perform the test:
- First, turn off the dirt bike and disconnect the battery to prevent any electrical shocks.
- Locate the wiring harness of the dirt bike, which is usually found under the seat or in the handlebars.
- Use the multimeter to check for continuity on each wire in the wiring harness. Set the multimeter to the continuity setting and touch the probes to each end of the wire. If there is continuity, the multimeter will beep or show a reading on the display.
- Check for any damaged or frayed wires that may be causing a short circuit. Replace any damaged wires or connectors.
- Test the voltage output of the battery and other electrical components using the multimeter. Make sure they are supplying the correct amount of power to the dirt bike.
- Reconnect the battery and turn on the dirt bike to see if the electrical components are functioning properly. Test the headlights, turn signals, and other electrical systems to ensure they are working.
- If you are still experiencing issues with the wiring, consult the dirt bike's manual or contact a professional mechanic for further assistance.
What is the proper procedure for testing the stator on an electric dirt bike?
- Disconnect the stator wires from the rest of the electrical system to isolate it for testing.
- Use a multimeter to test the resistance of the stator windings. Set the multimeter to the resistance or ohms setting and check the resistance between the stator leads. Consult the manufacturer's specifications for the acceptable range of resistance values.
- Check for continuity between the stator lead wires and the stator core. There should be no continuity, as this would indicate a short in the stator.
- Test the stator for voltage output while the engine is running. Use the multimeter to test the AC voltage output between the stator leads. Rotate the engine at a steady speed to ensure accurate readings.
- Compare the voltage output readings to the manufacturer's specifications for the electric dirt bike to determine if the stator is functioning properly.
- If any of the tests indicate a fault in the stator, it may need to be replaced or repaired by a professional mechanic with experience in working with electric dirt bikes.
What is the process for testing the fuse on an electric dirt bike?
To test the fuse on an electric dirt bike, follow these steps:
- Turn off the dirt bike and disconnect it from the power source.
- Locate the fuse box on the dirt bike. The fuse box is usually located near the battery or under the seat.
- Carefully remove the fuse from the fuse box. You may need to use a pair of pliers or a small screwdriver to gently pull out the fuse.
- Inspect the fuse for any signs of damage, such as a broken filament or discoloration. If the fuse is damaged, it will need to be replaced.
- If the fuse looks fine, you can test it using a multimeter set to the continuity or resistance setting. Place the multimeter leads on each end of the fuse and check if there is continuity (a complete circuit) or resistance (a broken circuit). If there is no continuity or very high resistance, the fuse is blown and needs to be replaced.
- Once you have tested the fuse, replace it back into the fuse box if it is still functional. Make sure it is securely in place.
- Reconnect the electric dirt bike to the power source and turn it on to see if the issue has been resolved. If the bike still does not work, there may be another issue at hand that needs to be addressed.
What is the most common cause of an electric dirt bike not starting?
The most common cause of an electric dirt bike not starting is usually a dead or low battery. Other common reasons could include loose connections, faulty wiring, a blown fuse, or a malfunctioning ignition switch.
How to diagnose a problem with the throttle cable on an electric dirt bike?
- Check the throttle cable for any visible damage such as fraying, kinks, or tears. If the cable appears damaged, it may need to be replaced.
- Test the throttle cable by twisting the throttle grip and observing how it responds. If there is any resistance or the throttle does not return to its original position smoothly, there may be an issue with the cable.
- Inspect the connection points of the throttle cable to ensure they are secure and properly attached. Loose or improperly connected cables can cause issues with throttle response.
- Check the throttle assembly for any obstructions or debris that may be causing the throttle to stick or not function properly.
- If the throttle cable appears to be in good condition and properly connected, but the issue persists, it may be necessary to consult the manufacturer or a professional mechanic for further diagnosis and repair.